Background:
We need to register a member in many websites, and some users will share the same password cross different registration. This is RISKY and HARMFUL. All email accounts will be hacked very easily when share same password. Even in different registration using different password, there is still a security concern and high risk on password leakage.
There is a lot of phishing emails at anytime and anywhere. When clicked the phishing website link unconsciously and unawareness, follow the steps to input the email address then input the password. Unfortunately, the password is already stolen in the backend.
We are receiving a lot of fake emails and there are numerous phishing websites nowadays. Email password leakage is very common and happened at any time. Most internet security application still hard to stop filter out the phishing emails. So, we need to have concept to protect ourselves. There are few ways to enhance the internet security from password leakage. This article introduces one of them.
Password leakage:
At least three protections can prevent password leakage and the email account being hacked:
- Use hard break email password combination (at least one numeric digit, one special character, at least 6 letters)
- Use two-factor authentication, one is the general password then need to input the one-time password
- Use the email alias to communicate external. Use the primary email address only for login. Primary email address keeps securely, non-public, non-disclosure
Note:
The first one is obviously not enough for password leakage. Gmail and some email providers use second one and Outlook.com has both second and third method.
Terminology:
An alias is an additional email address associated with the existing email account. This alias address uses the same mailbox (inbox, outbox. draft), contact list, and account settings as the existing email address. The sign in password is also same.
Primary address is the existing email address that always treated as sign in unless changed it.
Email alias:
This article discusses the email alias provided by Microsoft Outlook.com. The Microsoft Exchange server support email alias. The outlook.com, hotmail.com, live.com, msn.com are managed by Microsoft, but only Outlook.com supports email alias. Outlook.com allows to create multiple aliases (but restrict to add too much at the same time) associated with single account.
There are two ways to enable and use the email alias. One is verified the user identity with the verification email. Another is the registered email account must input the mobile contact number. Without valid mobile phone number, the email alias option is disabled.
Note:
The primary email address will be the main address that used to sign in and appear on all Microsoft devices. In this article, only suggest use the primary email address to sign in, all other alias only for sending and receiving emails.
Pros and Cons:
The advantages to use the email alias as follow:
- An additional email address that uses the same inbox, outbox, contact list, and account settings as in primary email address
- Email sender can be separated easily, different email address represented different email sender
- Register different websites or apps use different personal email address and keep the primary address non-disclose
- Use the single email login but with multiple email addresses
The disadvantages are as follow:
- Need to manage different email addresses, keep record and the relationship between such address
- Keep the primary address securely and must aware not to reply any emails by the primary address. Send any email from primary address is disclosed the login address to external
For the security concerns over the disadvantage of using alias, this remaining part introduces the procedures to add alias.
Add alias procedures:
The setting is only suitable for existing account. In case you want to a fresh start, it needs to sign out of Outlook.com and then create a new account. The rest procedures are almost same.
- Go to Add an alias (https://go.microsoft.com/fwlink/p/?linkid=864833). It will prompt if not signed in the Microsoft account.
- Under Add an alias, there are two options, select “Create a new Outlook.com email address and add it as an alias.”
- Select “Add alias” to confirm the input.
Notes:
An alias email address only allowed to add non-existed address.
An alias email address only accepts letters (a-Z), numbers (0-9), dot (.), underscore (_) or dash/hyphen (-).
Not allowed to add alias in this address: @hotmail, @live.com, or @msn.com.

Figure 1. Add an alias.

Figure 2. Create a new Outlook.com email address and add it as an alias.
Primary address:
Keep only one primary sign in to protect password leakage. After added the email alias, the next step is to remove all other primary addresses.

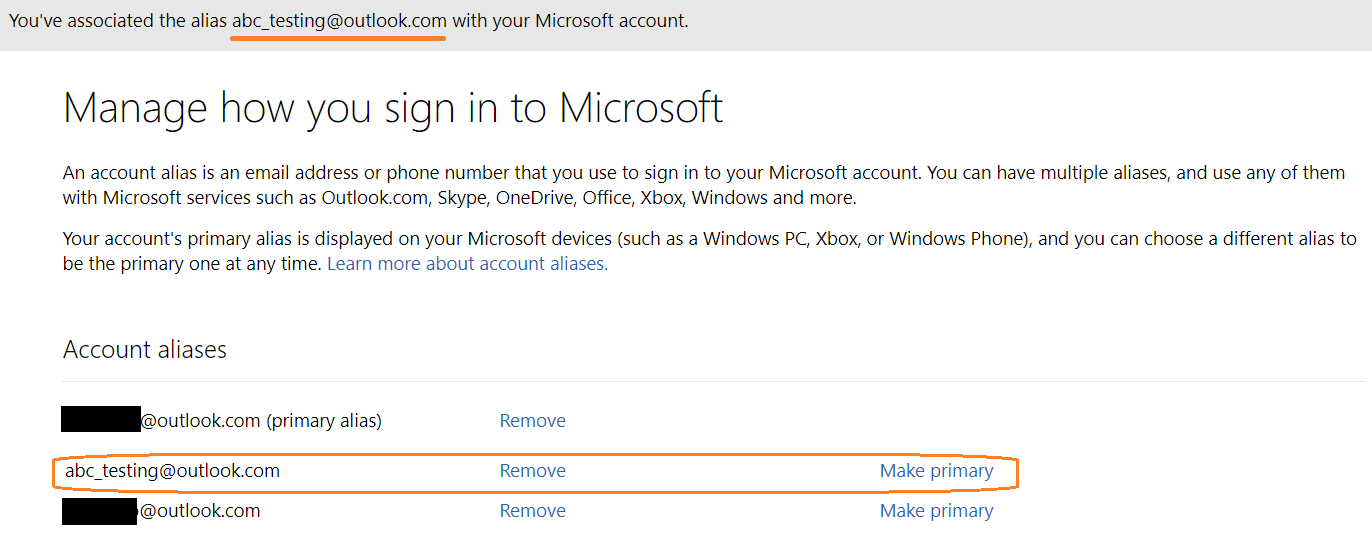
Figure 3. Manage how you sign in to Microsoft. Select one of the aliases to primary. The primary alias is the new create account address.

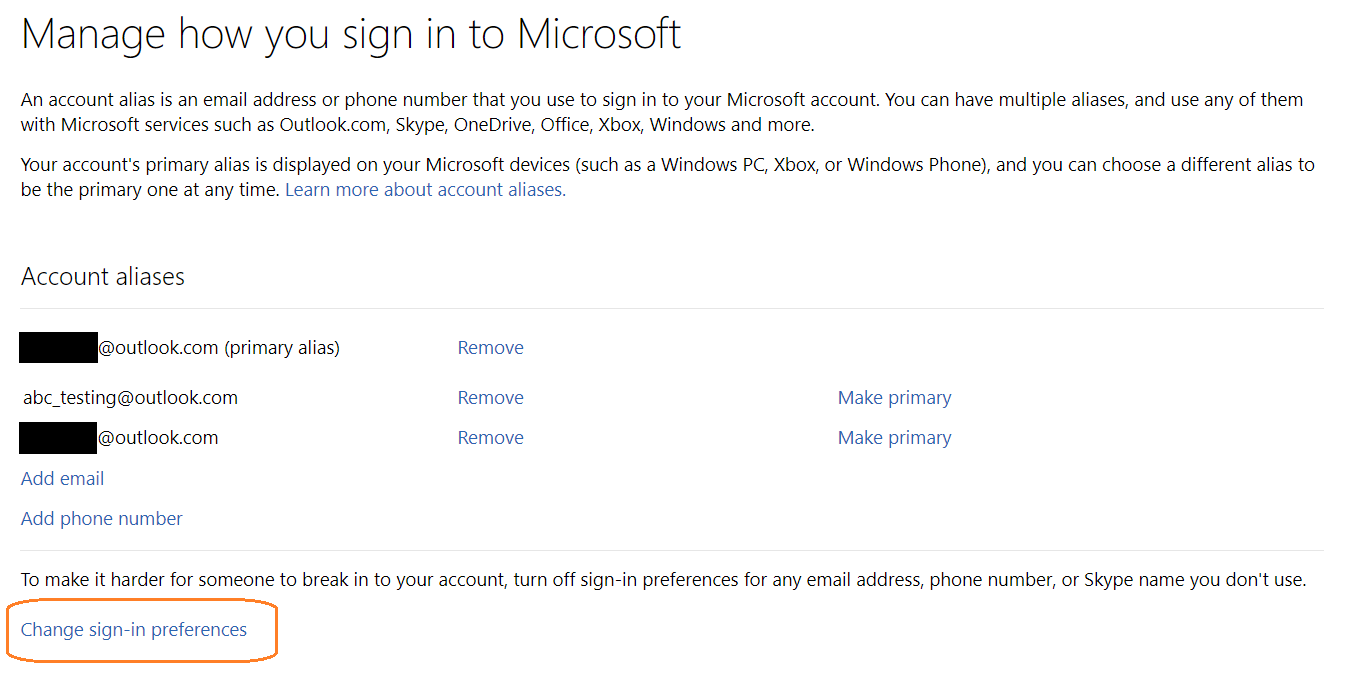
Figure 4. Select the “Change sign-in preferences” to set only one primary.

Figure 5. “Sign-in preferences” page.

Figure 6. “Sign-in preferences” page, keep only the primary alias allowed to sign in.
In case you want to direct manage the sign in preferences, do the following steps:
- Go to the link to Manage the Sign in Preferences in Microsoft (https://go.microsoft.com/fwlink/p/?linkid=842796). It will prompt if not signed in the Microsoft account.
- Near Account alias address, select “Make primary” that you want to use as your primary alias.
- Keep only the primary alias allowed to sign in.
Notes:
Refer to Figure 4, select the “Change sign-in preferences” to set only one primary.
Default outgoing alias:
The primary alias only for sign in, so need to set the send email from another alias. This is very important not disclose the primary alias to outside. In web base or mobile setting, you can set the default outgoing alias. In Outlook application, need to change the outgoing email address every time. In the compose window, select “From” (outgoing alias) and choose the outgoing email address you want to use.
You can also change your default outgoing (“From”) address:
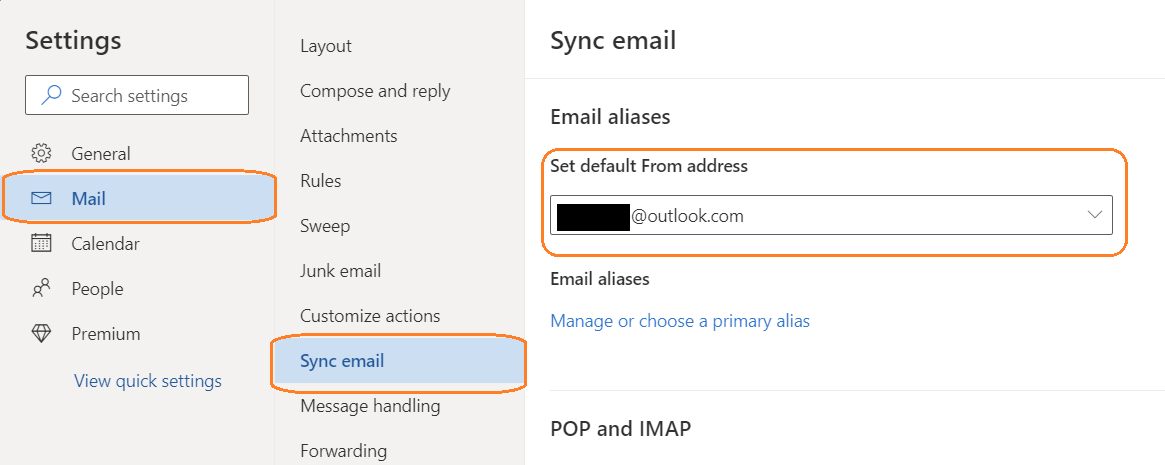
- Go to “Settings” > “View all Outlook settings” > “Sync email”.
- Under Set default From address, choose the address from the list that you want to use as outgoing address.
- Select Save.

Figure 7. “Settings” button.

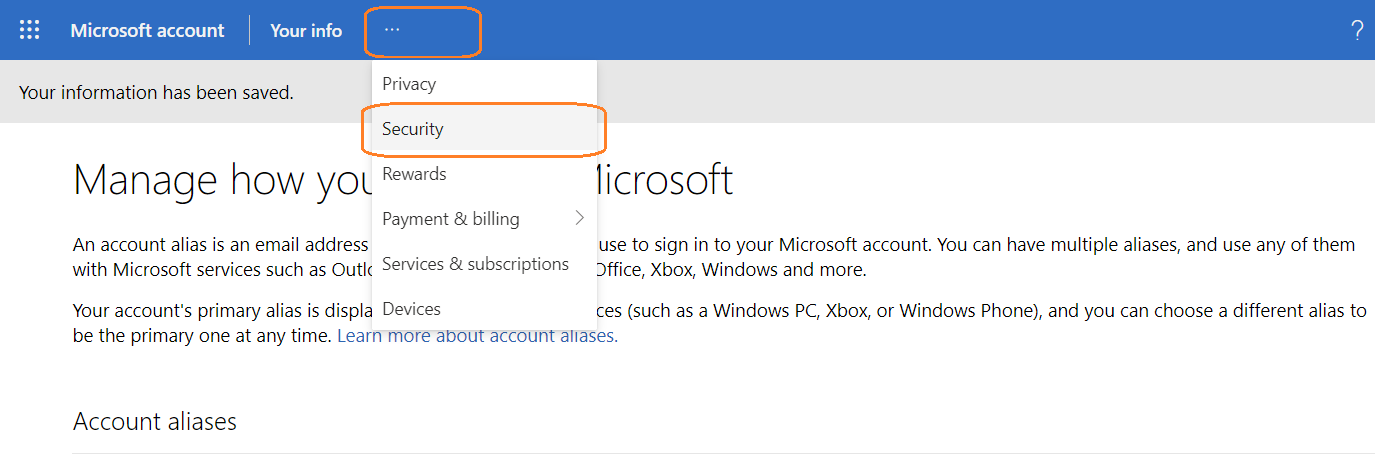
Figure 8. “Settings” from Security menu item (an alternate method to set the default From address).

Figure 9. Set the default From address.
Warning:
NEVER set the primary alias to From address. Always keep the primary to non-disclose.
Conclusion:
Email Aliases can help to organize the mailbox with single account. In addition, setup the primary alias properly can help to enhance the disclosure of the sign in email address publicly.